

Did you know?You’re more likely to experience this injury if you’ve had tennis or golfer’s elbow before!
So what can you do?
-
Apply ice to the sore spot on your thumb/wrist. A quick way to do this is to grab an ice cube and hold it in a small piece of tissue paper and then rub it directly on the painful area for 2 minutes. Repeat 3-5 times a day, or to help you remember, whenever you sit down for a meal.
-
Avoid the repetitive movement that’s causing the problem. This does NOT mean you should stop picking up your baby, or stop doing things you love doing. You just need to learn how to modify.
Then, consider these tips and tricks to try and let your wrist and thumb heal.
I will tell you first-hand, these things are not easy to do. Bear with me though, give them a shot, and just do your best! Even if you are mindful and try to change your positioning once or twice a day it is better than continuing repetitive movements that hinder progress.
-
When picking up your baby, think about keeping your wrists in a neutral position (ie not bent) and pick your baby up by their trunk, not under their armpits. Another way I like to think of this, is to have a firm but comfortable grip around their torso/rib cage.
-
Also when picking up your baby, try to get as close to your baby as possible so that there is less torque on your thumbs and wrists. If my baby is not fussing, I take an extra second and slide her closer to me in her crib so I don’t have to reach as far to pick her up.
-
Try scooping baby up by lifting under their bottom. This takes some practice, but once you’ve mastered it you’ll see why it’s worth it. Sometimes I cheat and pick my baby up however is easiest for me, and then quickly change positions to carry most of her weight by scooping under her bottom. Aah sweet relief for my poor thumbs and wrists.
-
Review your breastfeeding position. If you are resting your baby’s head on your hand it could be aggravating your wrist pain, so try to use pillows to help find a better position. Midwives initially taught me to breastfeed by holding baby with one arm and holding my breast with the other hand, but soon my wrists were so sore I considered stopping breastfeeding altogether. Luckily, I hired a Lactation Consultant who showed me this amazing way to nurse comfortably without straining my wrists, arms, and hands.
-
Consider taking a break from swiping left. Or right. Or in any direction for that matter. Those repetitive movements of the thumb are not your friend right now. As much as we all need social interaction right now, it’s best to take some time away from your phone and let your thumbs and wrists heal.
Once any sharp pains have resolved, here are some more things you could try:
1. Contrast baths
Ice is still helpful to decrease pain and inflammation, but now you can start putting some heat on your wrist as well to promote increased blood flow and loosening up of the tissues.
-
-
Try this:
-
Prepare a medium-sized pot with hot but not scalding water.
-
Then, start with ice and rub an ice cube on the area for 30 seconds.
-
Then, place your thumb/wrist in the water for 60 seconds.
-
Repeat for a total of 10-15 minutes, ending with ice.
-
-
2. Stretching
Thumb extension stretch
Hold for 20-30 seconds, or as tolerated. You should feel a gentle stretch on the thumb pad area in your palm. Repeat 3-4x throughout the day.

3. Strengthening
Resisted thumb opposition
Bring your thumb and your pinky together, and provide resistance to your thumb using your other hand. Hold 5 seconds, relax your hand, and repeat 7-8x.
Repeat this exercise 2-3x/day, remembering to never do anything that causes you pain.

Resisted thumb extension/abduction
Starting in the same position as the previous exercise, now place your other hand on the back of your thumb to resist opening the thumb/hand. Hold 5 seconds, relax your hand, and repeat 7-8x.
Repeat this exercise 2-3x/day, remembering to never do anything that causes you pain.

Resisted radial deviation
Find an object that you can grab comfortable like a hammer or long water bottle. I weighed this one, and it’s just a hair over 1lb so it’s perfect! With your hand holding one end of the bottle/hammer/etc and your thumb pointing towards the ceiling, slowly bend your wrist up and down.
Repeat 7-8x, and then 2-3x throughout the day.


Have you tried these things and you still haven’t experienced sufficient relief? Perhaps you need an appointment.
-
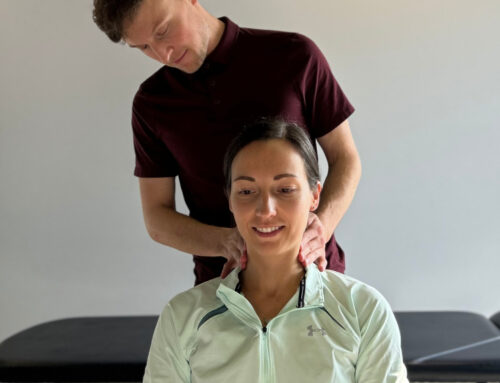
A Physiotherapist will assess the muscles and tendons and may do soft-tissue techniques to massage the tight muscles around the area. Graston techniques, or contract-relax manual therapy exercises may also help to stretch the tight fascia around the area. Therapist-assisted stretches can also be beneficial to promote healing. Therapists will also prescribe more specific exercises based on your individual concerns, history, and goals.
-
In some cases, we may need to splint the thumb in order to give it some rest. First we would try Kinesio-Tape (the stretchy coloured tape) which has some give to it and you can still do most movements, then if that isn’t enough to stop you from being careful with your thumb we would try Athletic Tape (like you may have seen for basketball player’s ankles) which restricts more motion OR a removable over-the-counter splint.
-
Modalities like Ultrasound, Acupuncture, or IMS Dry Needling may also help to promote healing of the tendon by encouraging an increase of blood flow to the area.
Not sure which treatment is right for you? Contact us today to talk to a professional and find out how we can help you.

Book a FREE 15min ONLINE CONSULTATION
Let our professionals help you achieve your goals while staying at home.


Follow us on Facebook or Instagram for the most up-to-date news.